Wednesday, October 24, 2012

A Question for my Reader's

Hi Everyone! I was thinking of adding a Nutrition Facts label at the end of my recipes. Is this something you would find helpful? It would like just the label below.

Nutrition Facts Label


In addition, I am currently working on a "How-to" piece regarding: How-to read, compare, and interpret Nutritional facts and ingredients from the labels on food products. If there are any specific questions you have regarding this topic and would like adressed in my "How-to" post, please comment or message me and I will gladly address your questions within the "How-to" post, or via comment!

Thanks :)

Tuesday, October 23, 2012

Amped Up Grilled Cheese

Amped Up Grilled Cheese
*Personal portion

Ingredients:  
2 slices of Bread (your preference, I usually use 12 grain bread)
Butter
Cheese (your preference, I use 2 slices of pepperjack cheese)
Veggie(s) (your preference, I used 1/2 of a chopped green pepper)
Optional: A Sprinkle of Ground Flaxseed  

How-to:  

1.) Slice bread and prepare your veggies.  


2.) Butter one side of each piece of bread.  

3.) Construst your sandwich in the following way: Bread- buttered side down on pan, 1 slice of cheese, veggies, a sprinkle of ground flaxseed, 1/2-1 slice of cheese on top of veggie, then top with bread buttered side up.  


4.) Cook on medium to medium high heat. Brown both sides lightly.
*My tip for knowing when it's ready to flip... Once the butter on the top piece begins melting and the edges of the cheese begin melting, the grilled cheese is usually good to flip!


I'm really interested to hear if you create your own version of the Amped Up Grilled Cheese! Please feel free to comment with your delicious creation:)  

**ENJOY!**  

Prep Night!

Hi everyone! I hope you're having a great week so far! Generally, yesterday's post would have been regarding the meals I made over the weekend to prepare for this week. However, this past weekend I was sick and just trying to rest and relax. Although I did make some soup and yummy treats, I didn't really prep any meals for the week. Last night I decided not to cook and prepare the week's meals because, well, the last Presidential debate was on and I couldn't miss it! So, tonight is going to be planning and prepping day this week. Like anything in life, just because it didn't go the way you initially planned it to, still complete your task/goal. The sooner the better! So tonight it is!

Yesterday, being the multi-tasker I am, I was coming up with ideas for meals this week. Knowing that I'd be in the kitchen prepping tonight, I tried to think of a quick and easy dinner we could squeeze in before I took over the kitchen. As you may remember, I love gourment, healthier versions of the Classic Grilled cheese sandwich. One of my favorite ways to make grilled cheese healthier is by to adding veggies to the sandwich, which inspired me to create what I call, Amped Up Grilled Cheese. I don't think you can go wrong when it comes to adding veggies to your grilled cheese so use your imagination and tastebuds and try to create your own Amped Up Grilled Cheese for you and/or your kids! I generally use chopped up green peppers, mostly because I often have extra green peppers in the house. I also like to add a kick to the sandwich by using low-fat, sliced pepperjack cheese. Now, you can also take it to a whole 'nother level by adding some ground flaxseed to the inside of your Amped Up Grilled Cheese sandwich!

1.) Amped Up Grilled Cheese
Amped Up Grilled Cheese w/chopped green peppers!
Our quick and easy dinner, leftover: Apple Butternut Squash Soup and Amped Up Grilled Cheese.

Occasionally, I notice some food going south fast, so I try to use it ASAP! We never want to waste any food. On that note, my bananas weren't looking so hot, so I decided to fast track my Whole Wheat Banana Nut muffins to make tonight. I gotta tell you, I'm pretty excited about these muffins. I'm right in the middle of my semester and my time in the morning is limited, so making these grab-n-go healthy muffins is exactly what I need!

2.) Whole Wheat Banana Nut muffins

I don't have a ton of time tonight, so this is all I am prepping in advance. However, that doesn't mean I am not cooking throughout the week... Tonight, I took some boneless, skinless chicken breasts out of the freezer for Baked Chicken Parmesan tomorrow night. Also, it's looking like it's going to be Taco Thursday. So, expect a killer Fresh Guacamole recipe, and black beans and quinoa as a side!

Cheers!

Sunday, October 21, 2012

Apple Butternut Squash Soup

Apple Butternut Squash Soup

Ingredients:

1 medium Butternut Squash (it should portion to 6 cups, once cubed)
1 yellow onion, chopped
1 cup carrots, chopped
1 cup celery, chopped
1 tart green apple (I used Granny Smith apples)
4 cups Low-Sodium Vegetable stock (32 oz)
Pinches of nutmeg, cinnamon, mild curry to taste
Salt and pepper to taste
Olive oil

Optional:
1/4 cup heavy cream

1.) Prep your Butternut squash first. Start by cutting off the neck and the top (where the stem is). Next, peel the squash using a good quality peeler. Then, slice the squash into 1-inch wide pieces, and after that cube the squash. Your cut and cleaned butternut squash should be roughly 6 cups.
*There are many ways to prep butternut squash, if you know a better way feel free to use it!

2.) Chop the onion, celery, and carrots into small, similar sized pieces for more efficient cooking.

3.) In a large pot, heat some olive oil (roughly 1-2 tablespoons) over medium high heat. Saute onion, carrots, and celery for about 5 minutes or until onions are translucent. If the onions begin to brown, turn down the heat.

4.) Peel, core, and cut apple into pieces sized similar to the butternut squash.

5.) Add squash, apple, and broth to the pot. Bring to a boil. Cover and simmer for 30 minutes, or until the squash has softened and can be pierced with a fork.
**Optional: While soup is cooking, whip 1/4 cup of heavy cream until lightly whipped. Fold in a small dash of cinnamon. Place in refrigerator and use later as a garnish.

6.) Puree in either a food processor, blender, or an immersion blender. Return to pot, add spices, salt and pepper to taste.
**Optional: When plating soup, add a swirl of cinnamon whipped cream. Not exactly healthy, but if you're in the mood to indulge it adds a nice flavor!

Makes around 6 servings.

I hope you enjoy this lovely Fall treat!

**Update: Pictures! (Don't judge me though, I don't have a great camera, and I have a low-light apt.)

**ENJOY!**

Sick Day = Soup Day

So, Friday I woke up feeling slightly under the weather. No biggie I thought, assuming I was just tired from work the night before. I went to class, then came home and found myself absolutely dragging and fatigued by noon. It was beginning, the sore throat was approaching, fast. This cold hit me like a ton of bricks and all I could do was try and think of ways to make myself feel better.

My first thought was curling up on the couch, watching scary Halloween movies and eating bowls of soup. In particular, I had a taste for Apple Butternut Squash soup. The next day, I sent my wonderful boyfriend, Tom, to the Farmer's Market with a list. He was hesitant at first, but then I told him my plan and soon we'd both be enjoying some great soup. I was unsure whether or not to get Granny Smith apples (tart apples) or Cortland apples (slightly sweet apples). So I thought, why not just get two of each? Extra apples are never a problem in my house, I love apples!

So, finally Tom was home with a bag full of goodies from the market, I was starting to feel less ill... possibly because I was excited to make this soup! I've never made Apple Butternut Squash soup, but, I had an idea of what flavors I wanted to taste and I looked up a few recipes as a point of reference for measurements. To anyone who has never this soup... it is SO easy and it's only got a few ingredients! I was really impressed by the simplicity and low cost of the entire process. Here's a link to my recipe for Apple Butternut Squash Soup.

1.) Apple Butternut Squash Soup

Later that evening, I was still a little hungry and craving something sweet. Clearly, I needed a dessert. I wanted ice cream (Vanilla Frozen Yogurt), but as an addition to something warm and comforting. My first thought was to make baked apples. Good thing I was indecisive earlier and had extra apples! My leftover apples were Cortland apples which is perfect because they are one of the types of apples I use in my Apple Pie recipe (I'll post that around Thanksgiving!). I couldn't recommend these Baked Apples enough! Not only were they AMAZING, they're also a low calorie dessert! I hope you enjoy these Fall treats as much as I did!

2.) Baked Apples

**ENJOY!**

Baked Apples

Baked Apples
*I created this recipe as a personal portion. 

Ingredients:

1 Cortland apple
1 tbsp softened butter
1 tbsp brown sugar
1 tbsp whole wheat flour
2 tbsp chopped walnuts or oats (or a 1:1 ratio of both)

1.) Preheat oven to 350 degrees
2.) Mix butter, brown sugar, flour and nuts/oats. *I used nuts only because that's all had in my cupboard and I chopped them to roughly the same size as oats.
3.) Cut apple in half. Scoop out the apples core.
4.) Top apples with mixture, place on cookie sheet or foil rolled up on sides, bake for 30 minutes.

I hope you enjoy these as much as I did! :)

**ENJOY!**

Friday, October 19, 2012

Roasted Beets

How to Roast Beets

Ingredients:

Fresh Whole Beets (all sizes are fine, I try to get ones similar in size... It's a little less work)
Olive Oil

Time: ~1-2 hours (depending on size)

1.) Preheat heat to 350 degrees.

2.) Wash the dirt off of the beets, some may need to be scrubbed.

3.) Leave the beets whole and unpeeled. If you have some larger beets, cut them in half. Cut the stems (leafy part) and ends off. *You can save the leafy part and steam just like spinach, so don't throw them out.

5.) Place cut and cleaned beets in a Ziploc bag (or bowl) and add a little olive oil. Then, shake the beets so they are lightly coated in olive oil.

6.) Transfer beets to baking sheet with aluminum foil and roast roughly 1 to 2 hours (depending in size). Or until tender and easily pierced with the tip of a paring knife.

7.) Allow beets to cool, and peel once cooled. *Peeling the beets is quite easy once cooled, the skin basically separates on its own. However, if you'd like you can also use a paring knife to peel them.

Thursday, October 18, 2012

My Love Affair with Beets

So, I've recently become addicted to beets (which isn't a bad thing). However, it's quite funny among my friends and family... See, I've been terrified of beets my whole life, I mean they look like they are bleeding! In fact, I'm pretty sure I have childhood memories of my mother eating beets, and both the look and smell used to make me want to throw up. But now, I eat beets so often, that my boyfriend Tom frequently jokes that instead of dating him, he thinks I'd be better suited with Dwight Shrute (from The Office). Why you ask... because he has a beet farm, duh!

Anyways, back to me and my beets. One of my favorite ways of eating beets, is in a Roasted Beet Salad. I've tried plenty of different versions of this salad in my neighborhood, all of which were great. However, in an ideal world, there were components of each salad that I wanted and some components that I could've done without. So, again, dining out has inspired me and brought me to my local Farmer's Market to buy some bunch beets and greens, and create my own lovely Roasted Beet Salad.

When I buy produce, I like it to have more than one cooking/eating purpose and beets were no exception. So, before going to the Farmer's Market I wanted to be prepared with two recipes. First being, the Roasted Beet Salad. When I got to the Farmer's Market I found a stand that allowed you to create your own bag of mixed greens, genius! I filled my bag with half Arugula, and half Mesculun greens, then also added a handful of Sunflower shoots, because why not! Later, at the grocery store, I also purchased some Granny Smith apples, goat cheese, radishes, and watercress. It wasn't long until I'd be enjoying my own Roasted Beet Salad!

1.) Roasted Beets
2.) Roasted Beet Salad

*I didn't buy a lot of beets, but, I still had some left and I needed a home for them... This is why I always think of two recipes when buying produce.

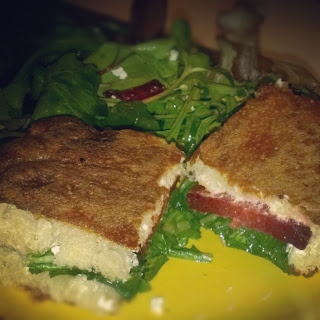
I'm home in the afternoons during lunch time so I decided to look for a quick lunch idea. Now, just so we all know, I'm a sucker for a healthier, more gourmet take on the traditional Grilled Cheese. So, while researching a second beets recipe (aka, speneding time on Pinterest), I found a recipe for a Beet, Argula, and Goat Cheese Grilled Cheese sandwich............. Umm, yeah. This was perfect and suitable since my love affair with beets stems from my previous fling with goat cheese. Also, I still had some goat cheese and mixed greens I bought earlier. After looking at the recipe I found, I didn't think it needed any major changes. So, I made it fairly similiar to the way it was orginally written.

3.) My Beet, Arugula, and Goat Cheese grilled cheese sandwich

*Planning ahead, is a great way to prevent wasted food! Over-planning (which is what I think I do) is even better!! Please let me know if you have any questions! PS, Regardless of how well you clean your bunch beets, while roasting them, your house will smell like dirt :)

**ENJOY!**

Beet, Arugula, and Goat Cheese Grilled Cheese Sandwich

Original recipe located here: Beet, Arugula, and Goat Cheese Grilled Cheese Sandwich

Indredients:

1-2 Roasted Beets
Olive Oil
Balsamic Vinegar
Arugula
Goat Cheese
Butter
Bread (I prefer whole wheat, and crusty breads)

**I do not add salt, even though the recipe calls for it. I believe the sandwich has enough flavor on its own. You'll notice not adding salt, is a trend for me. I prefer to add herbs if I believe more flavor is needed. I also opted not to add Sherry Cooking Wine, because I didn't have any at home.


1.) Begin using Roasted Beets or Roasting Beets. (If you are unfamiliar with how to Roast Beets, click the hyperlink and I've posted a recipe.)

2.) Add a little Olive Oil to a frying pan (about 1 tbsp.) and heat up your beets in the pan, frying them slightly to add a little crispness to them.

3.) While the beets are in the pan, toss the arugula with some Extra Virgin Olive Oil and Balsamic Vinegar (you need very little of this mixture, so make the bare minimum).

4.) Take beets off the heat. Butter the sides of your bread that will be touching the pan, and then add some goat cheese to the inside on both pieces of bread. Don't over do the goat cheese! Put just enough to cover each side of bread.

5.) Add the arugula to the bottom piece of bread, then top that with the beets. Add as many beets as you'd like. *I made half of a sandwich and used 1 medium size beet, which was 4 pan-fryed slices.

6.) Place sandwich back into the pan and cook as you would grilled cheese!

*I ate mine with a side of mixed greens. You could also add a serving of fruit to make it a well-balanced meal!


**ENJOY!**

Wednesday, October 17, 2012

What's for Dinner?

Everyday my boyfriend comes home from work and asks me the same question, "What's for dinner?" I used to enjoy the question when I had more time, but lately with school and work being so hectic, I was beginning to loathe it. I had to figure out a way to make eating healthy fit into our busier than usual lifestyles. I knew my answer was in planning ahead, but I wasn't sure what direction I wanted to take. After making meals day of, then not eating at home or together because of last minute schedule changes, I was wasting food and leftovers, and seeing my money get thrown out because my produce didn't last as long as my ambition. I decided to take a new route, which seems to be working so far.

So here it is: Plan ahead! When I know I have a busy week coming up I make sure to prepare some meals over the weekend. I also cut and clean half of my fruits and veggies for snacking. You never know what life will throw your way, which is why I now choose to freeze most of my prepped meals (even if the plan is to eat whatever you've made in one to two days). This way you know you'll be all set, which allows for unplanned scheduling changes. I looked up some good bulk recipe ideas for starters and my first weekend of doing this I started with three things I wanted to cook.

1.) Homemade Pasta Sauce
2.) Vegan Bulgur Chili
3.) Zucchini Bread

Now, the pasta sauce is a staple in my house. I make it every two weeks and leave one container in the fridge and the other two containers it makes in the freezer. I use this pasta sauce for a variety of things... Naan Pizza, Eggplant Parmesan, Pasta, dipping sauce, etc. I added the Vegan Bulgur Chili for something different, seasonal, and healthy. It made a HUGE batch, yielding around four to five large tupperware containers! But it has many uses, a nice mid-afternoon snack, or an entree by simply adding grilled cheese and mixed greens, or even over boneless skinless chicken breast and brown rice. The possibilities are endless! Finally, the oh-so delicious Zucchini Bread... It is my grandmother's recipe, which has been modified over the years (by her) to become healthier. She has the advantage of having a garden that supplies her with loads of Zucchini, which is why she makes so much of this delicious bread and is constantly trying new ways to make it healthier. Which, by the way, we're not complaining about! Anyways, I decided to make it this past weekend partially for nostalgic reasons, but mostly because zucchini is in season and I could use a good grab and go for the mornings! It made three loaves, so I froze two and left one in the fridge.

Grandma's Zucchini Bread

Grandma's Zucchini Bread

Ingredients:

3 cups grated zucchini (I use more because my zucchini is usually pretty big from the garden)
3 cups flour (I use wheat flour)
1/2 cup oil (I use 1/4 oil and 1/4 applesauce)
2 cups sugar (I use only 1 cup)
3 eggs
2 tsp. cinnamin
2 tsp. soda
1 tsp. baking powder
2 tsp. vanilla
1 cup chopped nuts

1.) Preheat oven to 350 degrees. Grease and flour 2 bread pans.
2.) Mix sugar, eggs and oil.
3.) Add grated zucchini.
4.) Add dry ingredients and mix well.

Bake: 1 hour @ 350 degrees

Love ya, Gram

**I decided to post this exactly how my Grandma wrote it to me.
**ENJOY!**

Homemade Pasta Sauce

Homemade Pasta Sauce (Chunky)

Ingredients:

1 (28 oz) can- Brad's Organic Whole Tomatoes in Basil
1 (28 oz) can- Brad's Organic Crushed Tomatoes in Basil
1 (14.5 oz) can- Muir Glen Organic Diced Tomatoes
1 (15 oz) can- Muir Glen Organic Tomato Sauce
1 (6 oz) can- Muir Glen Organic Tomato Paste
1 can- Artichoke hearts, drained
~3 tbsp. minced garlic
2 Organic Bell Peppers, cut into strips (I cut about 1 to 2 inch strips, because I like chunky sauce)
2 to 3 yellow onions, chopped
~3 tbsp. Dried Parsley
~2 tbsp. Dried Basil
1 to 2 tbsp. Crushed Red Pepper (start with one tbsp, increase as your spiciness desires)
Black Pepper
~1/4 c. Sugar
1 tbsp. Olive Oil

**And no I didn't forget to add salt to the ingredients list. The canned goods already contain salt, there is no need to add more. Also, it is important to buy organic bell peppers. Non-organic bell peppers contain high amounts of pesticides even after being washed vigorously numerous times.

1.) Over medium-high heat, heat olive oil in a large pot. Add chopped onions and bell peppers. Heat until onions are translucent.

2.) Add minced garlic and black pepper. Allow a couple of minutes for flavors to combine.

3.) Add all of the canned products, except for the tomato paste. Mix the sauce, ensuring the sauteed veggies get mixed in.

4.) Once the sauce warms up a little, add the tomato paste. Stir sauce until you have an even consistency. Cover.

5.) Once the sauce begins to bubble add the herbs and sugar. Stir sauce until the herbs and sugar are blended. Cover and simmer.

6.) Stir sauce regularly and keep it covered. Simmer for at least 1 1/2 - 2 hours.

**Before you store your sauce, allow it time to cool first!
**ENJOY**

Vegan Bulgur Chili

Vegan Bulgur Chili

Ingredients:

1 c. Bulgur (Cracked Wheat)
2 tbsp. Extra Virgin Olive Oil
2 onions, (1 white, 1 yellow), chopped
2 carrots, peeled/thinly sliced
1 red bell pepper, chopped
3 large jalapenos, minced
3 c. Organic Vegetable stock (low sodium)
1 (28 oz) can- Brad's Organic Crushed tomatoes (with puree)
1 (15 oz) can- Muir Glen Organic Tomato sauce
2 (15 oz) cans- Black beans (low sodium), rinsed/drained
2 (15 oz) cans- Kidney beans (low sodium), rinsed/drained
2 tbsp. White Wine Vinegar
5 Garlic cloves, minced
2 tbsp. Chili powder
1 1/2 tsp. Ground Cumin
1 1/2 tsp. Ground Coriander
1/2 tsp. Ground Cinnamon
1/2 tsp. Cayenne pepper

1.) Heat 2 tbsp. olive oil in a large pot over high heat. Add carrots, onion, and peppers. Saute until almost tender.

2.) Add tomatoes, stock, beans, bulgur, white wine vinegar, garlic, and spices. Bring to a boil. Reduce to a medium high heat and cook uncovered, until bulgur is tender and mixture thickens, stirring often. Roughly 20 minutes.

**ENJOY!**


Tuesday, October 16, 2012

Welcome to my blog!

Hello everyone, and welcome to my blog! I've been thinking about starting a blog for about a year now.. Finally, I took the plunge and here I am beginning my blogging journey! Going out to eat is probably my favorite thing to do, especially in Brooklyn. I find it inspiring and I am constantly trying to figure out what I am tasting and why it's so delicious. Unfortuantely, as a struggling student going out to eat can't happen as often as I'd like it to. Also, when you go out to eat, as healthy as food may seem, you can never know everything they put in a dish. Which is usually butter, oil, and salt. So good ol' home cooking is always your best bet! I cook at home a lot, and my freezer is almost always full of prepped foods for the week ahead. I hope to share with you some great recipes that I've created from my always inspiring neighborhood, my own imagination and palette, and adaptations I've made from existing recipes!

Follow Me on Pinterest